On the UI Setup page in the Settings tab you can adjust various settings specific to your event.
From the Admin UI, select the Settings tab
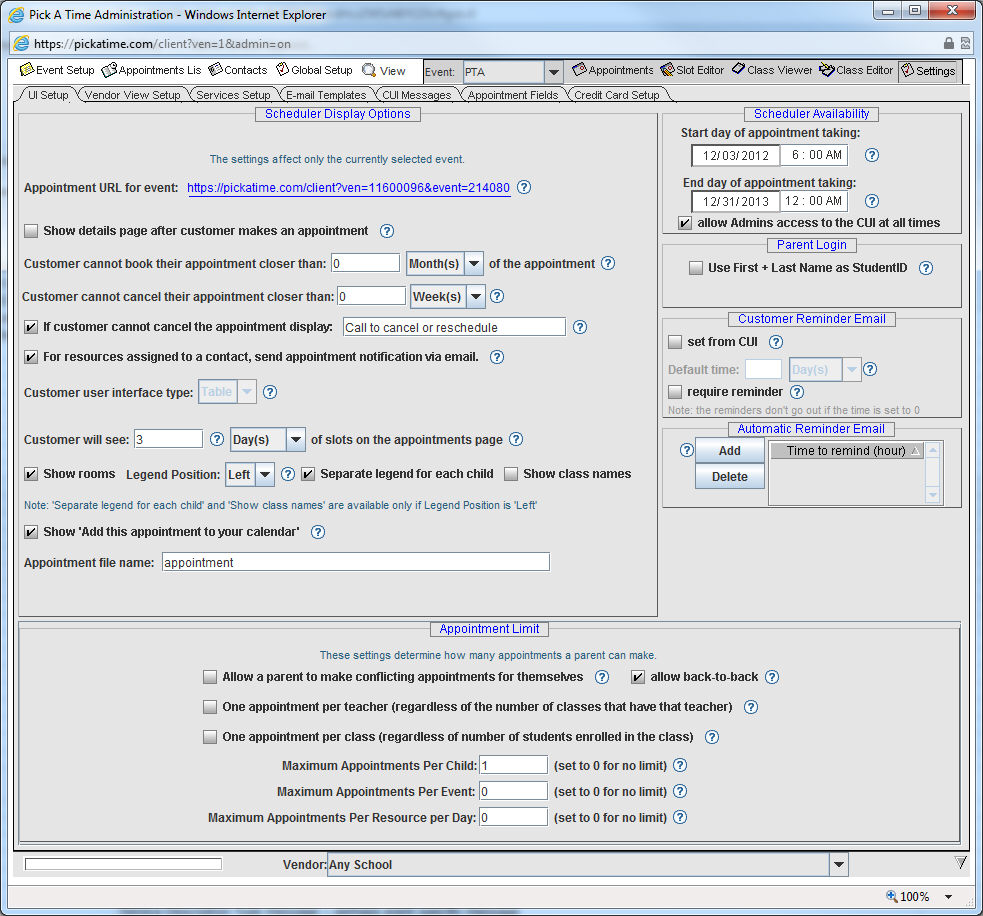
Select the UI Setup tab
From the top of the page, work your way down
The “Appointment URL for event:” lists the site address for the selected event that you can either use on your school web page or provide to parents in an email to use when booking an appointment. If you click on this link a new browser window will open up that is the Customer User Interface (CUI).
Check the "Show details page after customer makes an appointment" box if you would like a web page with appointment details to pop up after the parent has made an appointment. This feature is typically not used by schools when parents are making multiple appointments.
"Customer cannot book their appointment closer than X hours/days/weeks to the appointment" allows you to make slots become unavailable some amount of time before the appointment. For example if you do not want parents making an appointment one hour before the appointment then set this to one hour.
If you want to prevent parents from cancelling their appointment within some amount of time before the appointment alter "Customer cannot cancel their appointment closer than X hours/days/weeks. " Set this to 0 if you do not care if parents cancel a minute before they show up. Set this to a large value if you don't want them to be able to cancel the appointment.
Check the box "if customer cannot cancel the appointment, then display 'call to cancel' message", if you would like parents to see a 'call to cancel' message.
Check the box "for resources assigned to a contact, send appointment notification via email" if you would like an email to be sent to the resource (i.e. teacher, counselor) each time a parent makes an appointment.
The "Customer user interface type:" is set to Table for the PTA product.
The "Customer will see: X days/weeks of slots on the appointment page" setting determines how many days or weeks are shown on the CUI at one time.
Legend position can be set to either the top or the left. If you select a legend position of "left" you will also have the option of a separate legend per child, and if you have imported a class name you have the option of having the class name displayed after the teacher name. Important Note: In order to have the class name available on the printable schedule, you must have the legend position set to the left, and check the box "separate legend for each child" along with the box "show class names." Otherwise, the parent is booking an appointment with a teacher, but not a teacher and class combination.
Check the box Show "Add this appointment to your calendar" to provide your parents with the option of receiving an email calendar notification.
Appointment file name: allows you to enter in a name that the appointment file will be labeled.
The appointment limit section is where you can set limits on when a parent can make more than one appointment.
Check the box "Allow parent to make conflicting appointments for themselves" if you would like your parents to be able to book more than one appointment at the same time.
If the "allow back-to-back" is not checked the system will not allow a parent to make an appointment immediately following their previous appointment unless the two appointments are with the same teacher. This is used to prevent parents from making an appointment with two teachers one after the other in order for the parent to have time to travel from one appointment to the next. The system allows back-to-back appointments when the two appointments are with the same teacher regardless of this setting.
If you check the box "One appointment per teacher (regardless of the number of classes that have that teacher)", then a parent will only be able to schedule one appointment with the same teacher, even if their student has more than one class with that teacher.
If you check the box "One appointment per teacher (regardless of the number of classes or students that have that teacher)", then a parent will only be able to schedule one appointment with the same teacher, even if their student has more than one class with that teacher, or even if the parent has more than one child that has that teacher.
"Maximum Appointments Per Child" controls the maximum number of appointments allowed per child per parent. When they attempt to make too many the "customer message" will be displayed.
"Maximum Appointments Per Event" controls the maximum number of appointments allowed per event per parent.
"Maximum Appointments Per Resource per Day" allows you to set a limit of how many appointments per resource can be booked on any day. For example, you can create 15 slots on a day, but restrict the Maximum Appointments for the resource to 10. As soon as the 10th appointment is booked at any time on that day, no more appointments can be booked.
"Start day of appointment taking" Enter the date and time that you would like the scheduler to be open to your parents.
"End day of appointment taking" Enter the date and time that you would like the scheduler to be closed to your parents.
check the box "allow Admins access to the CUI at all times" to allow Administrators access to the parent scheduling page when the scheduler is not open to your parents.
Check this box if you would like the online scheduler to accept the StudentID in the format First Name + Last Name (ex. BenFranklin). This is useful if you are importing a numeric student ID that your parents are not familiar with. You can import your data with a numeric student ID, check this box, and then prompt your parents to enter in the First Name + Last name as the student ID.
Parents can be given the option of having a reminder email sent to them before their appointment. The parent can select how much time before their appointment it should be sent, but you can set the default value that will be shown to them.
Check the "set from CUI" if you want to allow your parents to set the default time to receive a reminder email.
Set "require reminder" to force your parents to receive a reminder email.
If you check both "require reminder" and "set from CUI" your parents will be able to select when the reminder email will be sent, but will not have the option of not receiving an email.
You can require email reminders and set the time in advance. Select Add and enter in the time (in hours) prior to the appointment that you would like an email reminder to be sent. You can add multiple times here for multiple email reminders.
IMPORTANT NOTE: The automatic reminder email will be created at the time the parent books the appointment. Once the appointment is booked, if you add a new automatic reminder time this will only apply to subsequent appointments booked.
You are now ready to configure your email.